
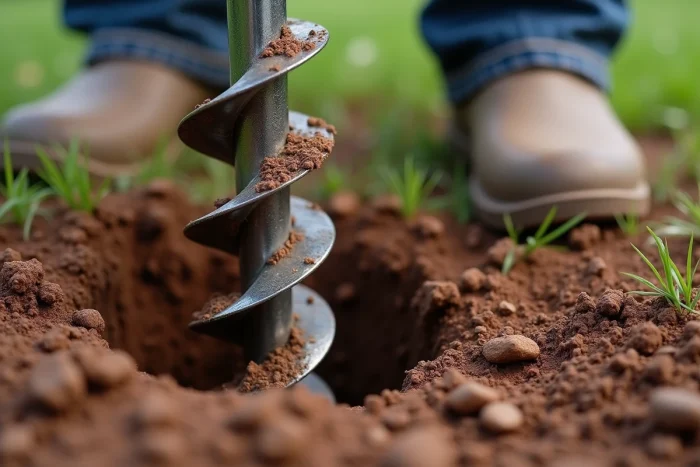
On clayey ground, the thermal auger sinks a few centimeters before slipping. On sandy soil, it descends quickly, but the walls collapse behind the bit. It is the nature of the soil beneath your feet that dictates everything else: reachable depth, bit diameter, and whether immediate casing is necessary.
This guide provides concrete benchmarks for conducting a thermal auger well drilling in your garden, from the first probe to commissioning.
See also : Chickenpox in children: should you keep them at home or send them to school?
Reading Your Soil Before Drilling: Clay, Sand, and the Limits of the Thermal Auger
You do not drill the same way depending on whether you are crossing topsoil, compact clay, or water-saturated sand. The first reflex, even before taking out the machine, is to probe the ground with a mining bar or a manual auger for the first meter.
Clay sticks to the blades and requires frequent pulls to clean the bit. Sand, on the other hand, disintegrates quickly: casing as you go down prevents wall collapse. In loose soil (garden soil, silt), progress is fast, but the stability of the hole decreases with depth.
Further reading : Home Network: Tips to Improve Your Wi-Fi Connection
When you hit rocks or a layer of bedrock, the thermal auger reaches its limit. A standard bit does not penetrate stone. Returns vary on this point depending on the models, but beyond a significant resistance, it is better to stop and consider a thermal auger well drilling assisted by a professional equipped with a rotary drill.
Choosing the Bit and Extensions: Adapting Equipment to the Desired Depth
The engine displacement matters less than the torque delivered at low speed. For well drilling, the goal is to descend vertically for several meters, not to quickly dig a post hole. A minimum 52 cc engine provides the necessary torque to cross clay layers without stalling.
The bit diameter determines that of the well. For garden irrigation use, a diameter of 100 to 150 mm is sufficient and allows for the insertion of a standard PVC pipe. Wider bits slow down the descent and put more strain on the machine.
- Rod extensions: they screw on as you progress. Each addition extends the drilling but also increases the torque transmitted to the arms, making the machine harder to control.
- Grip handle: working two people at several meters deep is not a comfort, it’s a safety measure. A sudden blockage of the bit in the clay can cause a violent torque backlash.
- Spare bit: the wear of the blades on compact soil is rapid. Having a replacement bit prevents interrupting the work halfway through.
Managing Torque and Vibrations at Depth
The deeper the drilling, the more the extensions amplify vibrations. You reduce the engine speed and pull the bit up every thirty to fifty centimeters to clear the earth. This regular pull prevents jamming, which is the main cause of blockage.
On clay soil, pouring a little water into the hole facilitates cutting and reduces bit clogging. On sandy soil, it’s the opposite: too much water destabilizes the walls and accelerates collapse.
PVC Casing and Water Supply: Securing the Well After Drilling
Drilling is only half the job. Without casing, the hole closes up within a few days in most soils. The PVC pipe (pressure or sanitation, depending on the diameter) is slid into the borehole as soon as the target depth is reached.
The lower part of the pipe, which plunges into the aquifer, must be screened. You make slits or small holes on the last few centimeters, then wrap this section in a geotextile to filter the sand. A poorly calibrated screening allows sediments to pass and clogs the pump within weeks.
Between the pipe and the borehole wall, fill the space with filter gravel in the screened area, then with sand or cement as you move up towards the surface. The goal: to prevent runoff water from contaminating the aquifer from the outside of the pipe.
Pump and Connection for Garden Irrigation
A surface pump is suitable if the water table is less than seven or eight meters below ground level. Beyond that, a submersible pump is required. The necessary flow rate depends on the use: irrigation for a vegetable garden requires much less than a supply for a swimming pool.
Declaration at the Town Hall and Water Quality: Often Ignored Obligations
In France, any extraction of groundwater for domestic use must be subject to a declaration at the town hall via a dedicated Cerfa form. This obligation applies even for a simple irrigation well. The administration records the location of the drilling and the intended use.
The physical separation between the private installation and the public drinking water network is a strict control point. No direct connection, even with a non-return valve, is allowed without a compliant disconnection device. The risk of polluted water returning to the collective network is taken very seriously by health authorities.
- The water from a private well is not potable by default. Before any food use, a laboratory analysis is essential to check the bacteriological and chemical quality.
- Quality can vary greatly depending on the season, depth, and proximity to pollution sources (septic tanks, treated crops).
- For use limited to irrigation or outdoor washing, analysis remains recommended but is not mandatory.
Drilling with a thermal auger remains the most accessible method for an individual wanting to reach a shallow aquifer. Success depends less on the power of the machine than on preparation: knowing your soil, planning the appropriate casing, and respecting regular pulls of the bit. A well properly cased and correctly declared provides irrigation water for years without heavy intervention.